You can easily Sync Settings in Windows 11 Operating System by using Windows 11 Sync Center. Synchronizing Windows 11 settings helps you to use and share the same settings, wallpapers, themes and other stuff on Multiple Computers with the Same operating systems. Microsoft introduced cloud synchronization in Windows 8 operating system, which comes with extended features in Windows 11 Operating System.
So, if you have questions: “How do I Sync My settings in Windows 11?” and if you can’t sync My Settings in Windows 11 then this article is for you. We’ve come up with this updated article that will save you a lot of time. We will share the interesting and easy method to understand the basics of Sync Settings in Windows 11 Operating System.
When Sync settings is on, Windows will sync the settings you choose across all Windows 11 devices where you’re signed in with a Microsoft account.
Synchronization in Windows operating system?
- In brief, the Synchronization helps you to share the same settings, Themes, Music, and many other things on multiple computers.
- Once you enable these settings in the computers, you can start using all the settings and apps stored on the other computers.
- Here is the full tutorial to Sync Settings in Windows 11 Operating System.
- Sync settings also work if you’re signed in with a work or school account linked to your Microsoft account.
- If Sync settings are not available on the device, your organization may not allow the feature to be used.
The settings you choose to sync are also saved in OneDrive. You can choose to sync your theme, password, language preferences, Ease of Access and other Windows settings (Other Windows settings). If you enable the Other Windows settings option, Windows will sync some device settings (for things like printer and mouse options), File Explorer settings, and notification preferences. For a complete list of settings that Windows can sync, refer to:
How Do I Sync My Settings In Windows 11:
About sync settings in Windows 11
- Windows keeps track of the settings sets on all Windows 11 devices after your sync is turned on.
- In Set Individual Sync Settings, you can choose to sync Theme, Internet Explorer Settings, Password, Language Preferences, Ease of Access, and Other Windows Settings.
- If the Windows 11 sync settings greyed out on your device, might your device not available for this feature.
Enable or disable Individual sync settings in Registry Editor
If not already done, you will need to enable Sync settings as aforementioned guide.
Open the Start menu, type regedit in the search box and press Enter to open the Registry Editor. If prompted by UAC, click Yes.
In the Registry Editor, navigate to the location below.
HKEY_CURRENT_USER\Software\Microsoft\Windows\CurrentVersion\SettingSync\Groups
Expand the Groups key in the left panel and click the subkey in the table below for the individual sync settings you want to enable or disable.
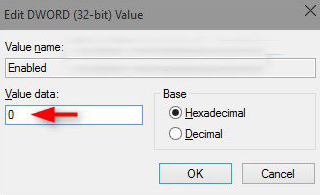
In the right panel of the subkey (for example, Accessibility), double-click the enabled DWORD to modify it.
To turn off personal sync settings: set Value data to 0. To turn on, set Value data to 1.

How to Customize Sync Settings on Windows 11
Before you can play with sync settings on your Windows 11, you have to login to Windows 11 through your Microsoft Account. Its because Windows 11 synchronization is carried out through OneDrive.
Access Sync Settings on Windows 11
- Open Start Menu
- Now Click Settings
- Than Click Accounts
- Click Sync your Settings On the right fringe.
- Sync your Settings in front you now.
Set On and Off Synchronization on Windows 11
- Go to the Sync your Settings like steps above.
- The first section is Sync Settings.
- Now you can see one option under this section which reads as Sync your settings on This PC.
- If you move the slider to the right then it will turn on.
- And if you move it to the left then it will be set to off.